Make a clay succulent pot with Sculpd
Sculpd show us how to use air-dry clay to create handmade succulent pots at home.
How to make a clay succulent pot with Sculpd.
Succulent pots are a fantastic project for playing around with textures and patterns. In this tutorial, we’re using our Sculpd tools, but you can use your latest beachcombing finds or have a rummage in your kitchen drawer to see what unique items you can use to create patterns on your pots.
We recommend making a clay pot that’s big enough to put your succulent in in its plastic pot, so you can remove it to water it separately.

You will need:
- A Sculpd Pottery Kit (this will make 4 – 5 succulent pots)
OR
- 1kg of Sculpd air dry clay (this will make 2 succulent pots)
- Pottery tools (or a knife and small spoon)
- White acrylic paint
- Waterproof varnish
- A paintbrush
You’ll also need :
- Succulents

Method:
1. To start, open your clay packet and take out half a bag of clay (about 500g).
Pro tip: Hold either end of your clay and twist to break the clay into two clean halves.
2. Form your clay into a ball by patting it with the palm of your hand and rolling it around on your work surface. Smooth any creases over with your finger.
3. Support your lump of clay in one hand. With your other hand, press your thumb into the ball, most of the way down. Leave about 2cm of clay at the base.

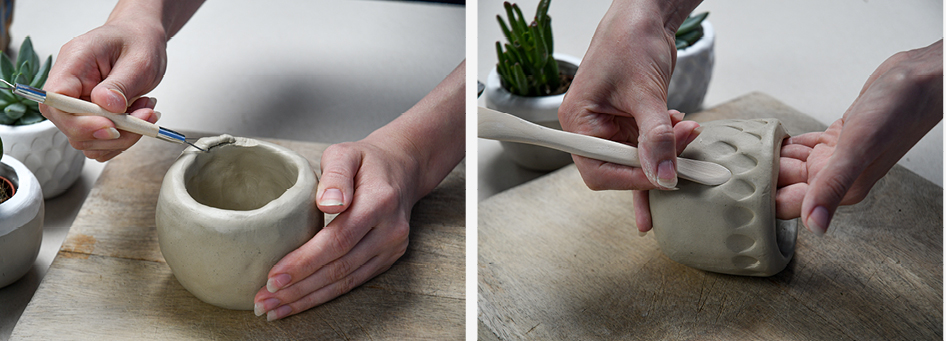
4. Once you’ve opened the clay into a cup shape, start using all four fingers to pinch on the outside of the cup to widen it into a pot. If your plant’s plastic nursing pot is too tall for your clay pot, scoop out some clay from the base of the pot on the inside using your ribbon tool or a spoon.
5. Flip your pot upside down on your work surface and start smoothing the outside of your pot with your finger, to buff out the pinching marks.
6. Turn your pot the right side up and use the ribbon tool or a knife to peel off any lumpy bits of clay at the rim of your pot, then smooth over again with your finger.

7. To create a pot with smooth, straight sides, gently roll your pot back and forth on your work surface.
8. Add texture to your pot by pressing your Sculpd tools or chosen items into the sides of your pot. Repeat this in rows to create unique patterns.
9. Leave your pot to dry for about 48 hours, until it’s completely hard and light in colour. Once dry, it’s ready to be painted and varnished. If you’re leaving the lovely natural colour of the dried clay on display on the outside, be sure to paint and varnish the inside of your pot to protect it from moisture.
Happy Sculpd-ing!
Find out more about Sculpd at www.sculpd.com and on Instagram @sculpdit.
We’d love to see your succulent pots – show us using #SeasaltArtsClub and tag us @SeasaltCornwall.
